
And the randomly selected winners of the ice cream ribbon are:
Britt P. & Whitney S.
I’ll be sending you both emails today requesting a mailing address. Congrats, and thank you to all who entered!
And the randomly selected winners of the ice cream ribbon are:
I’ll be sending you both emails today requesting a mailing address. Congrats, and thank you to all who entered!
We had a rough start to our weekend. Jax is getting his 2 year molars and barely slept Friday night. This turned into not napping Saturday. He was miserable. It was our 11 year wedding anniversary and I spent a good chunk of it soothing Jax. He eventually fell asleep after 5pm, only to wake up 45 minutes later. A trip to our neighbor’s house for s’mores cheered him up, though he wasn’t interested in the food. He loved the attention once he decided he didn’t have to be grumpy.
I haven’t started my next quiet book page, building a sandcastle, because I was working on another project (along with all the toddler drama. I was sewing myself a summer top! I’ll take photos and post all about it. Tomorrow morning I’ll get the quiet book pattern started before work. I’ll be posting sneek peek photos on the Facebook page.


You can find me on Instagram as user iolstephanie. Click here to get my photos via email – no Instagram account needed!

I think it was a perfect addition to the ice cream parlor awning. I have extra, so I am giving away two 37″ lengths of this cute ribbon to two lucky readers. The ribbon is 3/8″ wide, white with lavender and peach. It says “Ice Cream” and has little hearts.

To enter, leave a comment below. Please include an email address so I can contact you if you win. Winners will be chosen Tuesday, March 20th at noon.
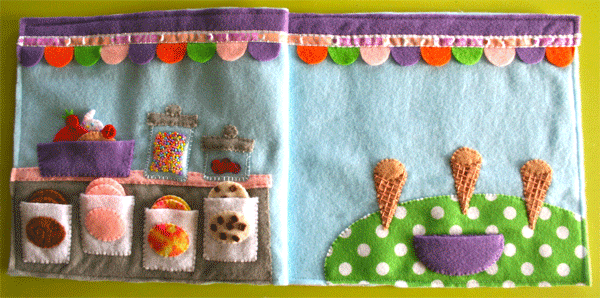
I’ve been quiet here, but busy busy busy! This week has been work, time with Jax and sewing the latest addition to Jax’s vacation quiet book: an ice cream parlor! (If you are a fan of the Facebook page, you can see little sneak previews as I sew up new pages.)
 This page is a mostly for-fun one, but does involve some matching (putting the ice cream away) and coordination (stacking the scoops on the cones.) Jax likes to count the scoops as he stacks. Our trips to the beach always involve walking to the ice cream parlor, so I knew I had to make this page! Please note that the pieces on this page are small. Scale them larger for a younger child and always supervise their play!
For this page I used: the pattern, 2 9″ x 12″ sky blue background felt sheets, felt (in purple, orange, lime green, pink, hot pink, gray, white, tan, brown, cream, lime green dots and yellow tie dye), ice cream ribbon, clear vinyl scraps, seed beads, sequins and embroidery floss. I got the patterned felt and spool of ribbon from my local craft store. I chose my felt colors based on the ribbon.

Background Elements: Sew down the table, ice cream case and and counter. The case is a simple gray rectangle, and the counter is a strip of pink. Pin your awning scallops under strips of matching felt (mine are purple) and sew a strip of ribbon across.

Bowls & Jars: For the purple ice cream bowl and the toppings tray, sew through both layers of felt along the sides and bottom. Along the top, sew only through the bottom layer, making a pocket. For the sprinkles jar, take a small rectangle of clear vinyl and felt in your background color. Sew up three sides, fill it with seed beads, and sew the top closed. I did this on the sewing machine to insure they couldn’t leak out. Sew the pouch down to the page. Sew a strip of gray felt across the top and a small circle as the jar lid handle. Repeat for the sequin “cherry” jar. You could also use bugle beads to make a jar of “jimmies”, but I didn’t have any in my stash.

Ice Cream Containers: Sew the labels to the bucket shapes so that you have one to match each flavor. I decorated two of mine first: dark brown stitched “fudge” swirls and little felt “chocolate chips”. Sew the buckets to the ice cream case along three sides, leaving the tops open. I staggered mine a bit to give them a little more room.
Ice Cream Scoops: Decorate both sides of the scoop if needed (I did the fudge swirls and chocolate chips mentioned above) then sew the two sides together. I decided not to use Velcro, snaps or magnets, but you could. I find that Velcro snags the background felt and wears the quiet book out faster. I wanted my ice cream page to be about free-play, so Jax can decide where they go.

Ice Cream Cones: I’d originally planned to have the cones be loose pieces, but the ice cream wasn’t staying on. I changed my plans and sewed three of them down to the table. This made it easier because I didn’t have to embroider both sides of each cone! I used 4 strands of tan embroidery floss and stitched a curving line to show where the inside of the cone was. Then I made long stitches in one direction down the length of the cone. Switching to perpendicular stitches, I wove the thread over and under to make a basket weave effect.

Toppings: I used the syrup pattern only as a guide for the basic shape and size, but cut the drips out different for each topping. Cut two sides for each one. I made three, but could have gone on forever! For my hot fudge sauce, I cut out two of the whipped cream pieces and decorated them with seed bead sprinkles. I sewed the two sides of the fudge together, then sandwiched that between the two whipped cream pieces, sewing them together as well. For the berry topping, I stitched the syrup together in hot pink. I free-hand cut out two oval shapes for the strawberry and one spiky green piece for the leaves. I pinned the strawberry around the top of the syrup with the green bit sticking out of the top and sewed it together. The caramel syrup with a cherry was done the same way, minus the green. I then sewed a sequin on to each side of the cherry to make it match the cherries in the jar.

I didn’t have to tell Jax what this page was (“Ice creams!”) despite him never having had an ice cream cone (we get bowls of frozen yogurt usually.) I did show him how to stack them on the cones and put them in the bowl and buckets and he took it from there. This is a fun page for both of us!


I’d love to see this made in different colors than we chose. Please share a photo if you decide to make this page! Stay tuned for a post with a chance to win lengths of my extra ice cream ribbon!
The weekend was way too short! I got my next quiet book page – an ice cream parlor – drawn and half sewn. I redid a dozen of my braids. I had brunch with my boys then walked to the playground. I didn’t get enough sleep. Time for another Monday…

 YOu can find me on Instagram at username iolstephanie.

We made our weekly trip to the kids’ thrift store today. I was a little nervous because yesterday Jax had 6 tantrums in 20 minutes at the mall (and would have had more if we hadn’t left!) And, I had gone there for him to show him a kids’ concert! Ugh. Thankfully, he was a total angel today.
There were massive piles of books this week and they wanted you to pick 10 for $1. It was a little overwhelming to go through them all, but we chose them together until we got to 10. (And took 10 old, baby level books out of his stash to donate once we got home.)
We got: Animals (Brainy Baby), Animals (Brainy Baby)
, The Pigeon Loves Things That Go!
, Spot Goes to School
and Gallop!
.

We got three Sandra Boynton books: Blue Hat, Green Hat, Barnyard Dance!
and Let’s Dance, Little Pookie
.

The last two appealed to the graphic designer in me: Animals and Fillmore And Geary Take Off! The Adventures of a Robot Boy and a Boy Boy. That one is a bit advanced and has paper pages, but I loved the illustrations.


I found two shirts for the summer – orange stripes and a cute retro ice cream design. I found shoes for the beach in his current size. Last year we bought them larger and they wouldn’t stay on. For $1.75, it’s okay if he grows out of them quickly! My favorite find is a pair of mint condition DC skater sneakers! They are a size up and so cute.

The final item was $1.75 and was Jax’s treat for being so good in the store. Since he has been studying the alphabet so much, he has come to love the word xylophone. He keeps asking to watch the xylophone Curious George episode on Net Flix. He was very excited to get this tiger one. It isn’t the greatest, but has more notes than his old baby one and you can use it as a piano too.
We stuck our heads into the adult thrift store, but nothing caught my eye.
Find any gems lately?
The Itsy Bitsy Spider
Climbed up the water spout.
Down came the rain
And washed the spider out!
Out came the sun
And dried up all the rain.
So, the Itsy Bitsy Spider
climbed up the spout again!


An animated gif would gave been too big for this page, so you’ll have to suffer through my singing! It was a bit tricky holding the camera in my right hand and opening the flaps/moving the spider with my left hand, but I managed!
This page was a request on the Facebook page (come join in the fun!), and one I though about a lot before creating. While it would have been more accurate to have the spider crawl up inside the spout, it would have obscured the view of him and made it hard to show the rain “washing him out”.
I decided what was important to me was being able to show the various stage of the rhyme, showing the weather (and the before/after that happens when the weather changes) and letting Jax control the spider.

 For this page I used: The pattern, background felt in a 9″ x 9″ sky blue square, green felt cut into fringe for grass, felt (in dark red, red, orange, yellow, yellow-orange, gold, green, sky blue, aqua, black and cream), light blue ric rac, tiny white ric rac (I didn’t have black), thin blue ribbon, thin gray ribbon, green looped ribbon, a button, sequins and embroidery floss.
To start, I pinned down the side of the house and the grass, then pinned and sewed the gutter on top of it. I pinned a piece of green ribbon in place for the flower stem then sewed the grass in place with 4 stitches at the bottom of each stem.
Sew the face onto the sun circle. I did a dashed line of stitches for a smile, three little stitches close together for a nose and sequin cheeks. For the eyes: I made a stitch, but before puling it tight, I made a tiny stitch across the center of it that held it in an arch shape. Pin the sun to the page on top of the rays and sew it down. I left the rays loose.

To decorate the “rainy” stage of the water spout, I sewed down some ric rac and felt raindrops. This goes on the water spout sewn to the page. To make the flap that covers it, sew the second (partial) water spout onto one of the house flap pieces, then sew them together, Sew it down to the page along the left side.

Next I made the rain scene. I sewed faces on the rain clouds the same as for the sun, but with French knots holding the sequins on. I sewed raindrops back-to-back onto the ends of ribbon scraps to make the rain. Pinning the clouds and rain to one side of the sky flap, I sewed everything down. Make sure the rain is not so long that it sticks out when the flap is folded down (the rain clouds will be upside-down when it is closed.)

I sewed two identical ladybugs. They have dashed smiles, French knot cheeks and eyes and black French knots holding the wings on the body. Lay everything for the ladybug rain scene out and sew it down: a dashed line down the middle of the leaf, a few stitches for each petal, a bunch of French knots at the flower’s center, a scrap of ribbon for the umbrella stem and stitches around the top and on the spines of the umbrella (leave the bottom open and stretch the felt a bit for a curved look). I added a button at the top of the umbrella – just because buttons are cute!

Figure out where on the page your sky flap needs to be so it covers the sun completely, then sew down a bit of the flower stem ribbon onto the other piece of the sky flap so that it lines up with the one on the page. Sew the flower and leaf the same as before. I place my ladybug in a slightly different spot, just because.
Sew the two sides of the sky flap together (the rainy side upside-down) and sew it to the page along the top.

For the spider I sewed eyes and a mouth on the front piece then layered ric rac and the end of a ribbon between the two sides of the spider’s body. I cut 4 pieces of ric rac and had them cross in the middle so they stuck out both sides. Sew around the spider’s body.

When sewing your page down to the backing, make sure to catch the other end of the spider’s “web” ribbon at the top so he is attached to the page. Stop and start at all the flap folds so you don’t accidentally sew the flaps closed. I used some cute paisley patterned felt as the back side of my page.

Jax can’t sing Itsy Bitsy Spider just yet (he does a great Twinkle Twinkle!) but he is starting to sing along to some of the words now that we have this page to play with. He especially loves the umbrella, which he calls a “boo-ya”!
What do you think?
Another week has flown by… Have you ever noticed how if you start doing something only once a week at the same time, life seems to speed up?
I am working on sewing and embellishing the Itsy Bitsy Spider quiet book page. I want to add some cute details and really focus on making it so Jax can “control” the weather and follow along with the rhyme.
Since I am at the sewing stage, I am already thinking ahead to the next page so I can start planning it in my head. I have a poll up on the Facebook page so you guys can help me pick what to do next: an ice cream parlor, bonfire with s’mores or sea life finger puppets!
Here is my week in Instagram photos. You can find me there at username iolstephanie.


I will be making a number of beach and summer themed quiet book pages between now and May when we take a road trip to the beach. My next page will be Isty Bitsy Spider, but I’m trying to decide what to do after that: ice cream parlor or bonfire and s’mores. What do you think?


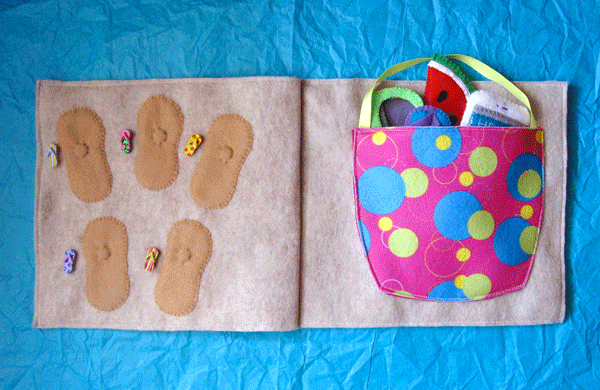
This is a two page spread that features both matching and my spin on the classic purse quiet book page. I wanted to make one, but I also wanted to make it gender neutral. When you open the bag, you’ll find sunglasses, an iPhone and a little snack of watermelon (Jax’s favorite!). The bag also holds all the flip flops from the matching page.


I had leftover flip flop buttons from the ocean i-spy page, so I decided to use them as the inspiration for the matching game. The flip flops are magnetic so they can stick easily to the footprints in the sand. If you don’t have the buttons, or wanted to do something different, you could make the footprints colored, or outline them with a color. You could even make two of each shoe and have them waiting in the sand for the other half of their pairs. I got my buttons from A.C Moore. They were $1.99 in the store.

 So for this page, I used: The pattern, natural felt for the background (I used 9″ x 12″, but you could use two 9″ x 9″ squares and mount them on white felt), felt (in pink multi-dot, hot pink, red, orange, yellow, light green, green, aqua, purple, light gray, dark gray, white and tan – lots of scraps!), stiff glitter felt in lime green, tinted vinyl (mine was blue, from my scrap stash), clear vinyl, batting or stuffing, flip flop buttons and ribbons.


Sand Footprints: Sew the footprints down to the page with a magnet under each one. Sew around the magnet to hold it in place. Sew each button beside a footprint.
 Flip Flops: I included all the pattern pieces I used to make flip flops that match the buttons. Decorate the top of your flip flop first. Sew a vertical line of stitches to attach center of the strap. Sew a magnet to the inside of the sole of the shoe, using a scrap of felt to hold it in place. Sew the top and bottom together around the edges, catching both sides of the straps in your stitches.
Beach Bag: Sew Velcro or snaps to the top of the bag lining pieces, making sure they line up. Pin a length of ribbon of strip of felt like a handle between the outer piece of the bag and one of the lining pieces. Sew across the top. Pin the other bag lining piece to the page and sew across the top. Pin the handle side of the bag on top of the side on the page and sew around the sides and bottom.

Glasses: Very simple! Layer your tinted vinyl between the two front frame pieces and sew them together. Sew each pair of frame arms together, them sew them to the front at the temples.

Watermelon: Sew the seeds to each red piece, then pin the red to the green. Sew a length of white ribbon over the edge of the red where it meets the green to make the rind (you could also cut some white felt and layer it between the red and green). Sew the front and back together, adding batting or stuffing if you want some dimension.
For the iPhone, please read the instructions from the iPhone and pocket watch page.


This page makes me even more ready to head to the beach! Hurry up, May!!
Have you checked out MyHabit yet? I’ve been stalking it, but having ordered yet. There are members-only discount shopping sites popping up all over nowadays. But, if you are already an Amazon customer, you can shop at MyHabit without needing to be invited. Plus, free shipping and big discounts? Sounds good to me!
They have a special kids’ section of the site offering clothes, toys, shoes and more. Ive seen some crazy deals on big KidKraft wooden kitchens. They sold out within an hour of being posted!
 Have you joined any discount shopping sites? What was you experience like?
The week flew by and the weekend went even faster! I’m doing my best to try to balance work, freelance, blog and sewing. Oh, and a toddler! And, now it’s time to redo my hair, which I keep in braids. I need more hours in each day…
I’m currently working on my version of a purse quiet book page – a beach bag! The other side of the page is a flip flop matching game. After that, I’m moving on to the Itsy Bitsy Spider. I just have to figure out what exactly a “water spout” is and when the rain comes down “and washed the spider out,” was he *inside* said water spout, or is “washed him out” just an expression. Most likey, I’m being too literal, as usual!


I’m trying to decide what tasty treats to bake this week. Last week we made oatmeal cookies. Any ideas?
I’ll be doing a lot of beach and vacation themed pages over the next two months leading up to our trip to the Outer Banks. There will be other pages as well, including an Itsy Bitsy Spider page coming up soon. Here is the first beachy page I’ve completed – an ocean-themed iSpy page!

This page is made to look like you are inside a ship looking out into the ocean. I didn’t want to get too fussy with the details, since the point it to hunt for the iSpy goodies. I couldn’t resist doing at least *something* to make it special, so I added faux wood grain. This page was done entirely on a sewing machine. It’s Saturday, so I was about to get two hours away from Jax to whip this page out.
For this page I used: the circle template, full sheets of felt in brown, light blue and yellow (the back of my completed page – yours could be different), gold felt for the window, orange scrap felt for the back of my photo key, clear vinyl, a scrap of ribbon, a 4″x6″ print of my iSpy trinkets, light blue pony beads and iSpy trinkets.
First thing you need to do is gather all the trinkets that are going into your iSpy game. I used ocean and beach themed buttons. Lay them all out on a sheet of white paper and take a picture. Print it out on photo paper or cardstock to use in your photo key.


I started the sewing by making the faux wood grain on the brown felt with tan thread. I made wavy lines, occasionally leaving an oval-shaped spot to add a “knot”. I didn’t bother to sew the wood grain behind where the window would be, since that would be cut away. I decided to do the whole page in brown instead of my usual 9″x9″ square sewn down to a white page. I aligned my page to be to the left hand page in my book as I plan to do a coordinating page for the right.


Lay your vinyl and window ring onto the page and pin it in place. Only pin vinyl where you know it won’t be seen – pin holes don’t go away! Sew around the outer edge of the gold ring. Flip the page over and carefully cut away the brown felt inside the circle so you can see through the window. Sew the inner edge of the window down. I went around twice.
Place your light blue felt behind the page and pin it on three sides. Leave the side that will be in the fold of your quiet book open. Sew around the three sides with a zigzag stitch. Pour your beads and trinkets into the page and pin the fouth side closed. Set the page aside to make your photo key.


 Take your photo print out and layer it between clear vinyl and a scrap of felt Insert a scrap of ribbon so you can attach it to the page. I folded my ribbon because it was only printing on one side. Sew all the way around with a straight stitch, trim it and round the corners and go around again with a zigzag stitch.
To close the page, pin the ribbon of your tag into the open seam then sew it shut with a zigzag stitch. Finish the page by sewing a piece of felt to the back and sew your grommet channels. I haven’t added my grommets yet. I tend to do a bunch of pages at once because I’m not a big fan of doing grommets!

I think it came out really cute! Now I need to think of a coordinating page for the right hand side…
