Sunday Souvenir – Letters

A simple post, as my day has been busy and went downhill right at the end.

When looking through my mother’s things, I found this letter she wrote my grandma when she was 8. The flowers make me happy – especially the little red swirls. So fifties and girly and sweet!

In my grandma’s things, I came across this letter I sent them when I was 5. I believe my mom died in June of that year, just before my fifth birthday. So, I’m not sure whose handwriting this is. Not my lefty dad’s! They wrote with two styles of a’s. I don’t remember anything I wrote about, but I know once i was in elementary school, I had sitters before school then stayed at school in the “after school program” in the cafeteria until my dad got off of work.

Leave a comment if write a Sunday Souvenir and you’d like your link to be added!

Jax’s 20 Month Painting

It is so, so pretty outside! The husband is cooking chili (My apple butter can wait till tomorrow. Chili, yum!), sun is shining and the baby finally took off his cranky pants.

We took advantage of the warm fall weather to do Jax’s 20 month painting. This time I added a sea sponge and showed him how to blot with it. He did a couple times, but them switched to using it like a brush with big strokes. We used autumn paint colors (mostly because that is all I have left!)

Apple Picking

We went apple picking today! I can’t wait to make a big batch of apple butter with part of our haul! To read all about our outing and see the full gallery, visit my personal blog.

What else should I make with our apples? We got 16.66 lbs!

Link-o-rama!

a photo from the orchard

We went apple picking today (I’ll post pictures soon!) and it put me in the mood for all things October!

I’m planning a Halloween craft tutorial for this month, once I finish designing it and get a couple supplies I’m missing.

Here are some autumn and Halloween links to inspire you!

Autumn Pumpkin Bread

Mmm! I love pumpkin bread in the fall (and all year round!) I’ve already baked 2 batches!

The recipe I’ve used for years makes either 3 short loaves or 2 full size loaves. I like to split the batter into 3 pans so I can give extra loaves away. If you just make 2, you’d probably need to bake them longer.

I’m not sure where the original recipe was from, but I’ve changed it a bit over time to make it spicier. Here’s what you do:

Ingredients

  • 1 15oz can of pumpkin puree
  • 1 cup of vegetable oil
  • ⅔ cup of water
  • 4 large eggs
  • 3 cups of white sugar
  • 3½ cups all-purpose flour
  • 2 teaspoons baking soda
  • 1 teaspoon salt
  • 1½ teaspoon ground cinnamon
  • 1 teaspoon ground nutmeg
  • ½ teaspoon ground cloves
  • ½ teaspoon ground ginger

Preheat the oven at 350° F and grease 3 loaf pans. I think ours are 9″x 5″. In a large bowl, mix the wet ingredients (pumpkin, oil, water and eggs) then add the sugar. In another bowl, mix the dry ingredients (flour, baking soda, salt and spices). I like to sift mine together, but I’m a bit addicted to my sifter! Add the dry to the wet and stir until it’s all mixed. Pour the batter into three pans and bake for 50 minutes. (My batter fills the pans ⅓ of the way and the loaves bake up to ½. So you could definitely just use two pans and bake a little longer for larger slices.

Yum! Pumpkin bread is so good with some hot chai tea!

Baking bread is on my Autumn Fun List, but I still plan to bake some yeast bread this weekend.

Dinosaur Quiet Book Page

Dinosaurs! Roar! Here’s the next page in Jax’s quiet book. His book is seriously going to be 10″ thick… And there are more pages I want to add. I still haven’t decided how I’m going to do the cover/case.

This is a fairly simple page. It has ribbons for texture and a peekaboo flap with a baby dinosaur inside an egg. Here’s what I used: sky blue background felt, olive green ground felt, lots of ribbon scraps, felt (in 3 shades of green, brown, natural (the egg), camel (inside the egg and some spots) and pink (spots on egg)), batting/stuffing, pinking shears and embroidery floss to match.


Start with your sky blue background piece. Cut a piece of felt for the ground. I used olive green and cut a slight hill into the top. Pin the tree trunk in place and sew the ground down. Cut some leafy fern shapes out of green felt with pinking shears. I made 4. Sew them in a fan shape at the top of the tree. I sewed up the middle about 3/4 of the length. Sew the tree trunk down.

Dinosaurs: To make the faces, I made a stitch for an eyelash then a French knot eye. I stitched the smile in stem stitch. Stitch loops of ribbon along the spine – shorter at the tail and neck. Stitch long, thin “spikes” to the end of the tail. I used all kinds of ribbons and rickrack from my stash (many were scrapbooking ribbons) but you could use all one color.

Egg: Start out by sewing the grassy nest down where you want the egg to be. I cut 2 pieces for my egg out of a natural colored felt and one out of a camel color for the inside of the egg. Sew the inner egg to the grass and sew the dinosaur baby onto it. I took scraps of pink and camel to make splotches to sew onto one piece of the egg shell. Be creative and decorate your dinosaur egg however you’d like! Layer a loop of ribbon between the two outer egg pieces as a handle, then sew them together. Sew an inch long section of the outer egg down to make the flap.


To finish up, I sewed the big dinosaur down, then embroidered freehand “Stomp!! Roar…” into the lower left corner. You could do the same, or have a big “D” for dinosaur.


If you use this pattern, please add a comment or link to me. I really would love to see your version! I think I’m in love with the little baby dino.

Do you like the page?

Life via Instagram

Here’s my second installment of Life via Instagram! I’m a little overwhelmed that it’s already October… Didn’t summer just start? Here are some of the photos I posted to Instagram (username @iolstephanie) in September.

iPhone & Pocket Watch Quiet Book Page

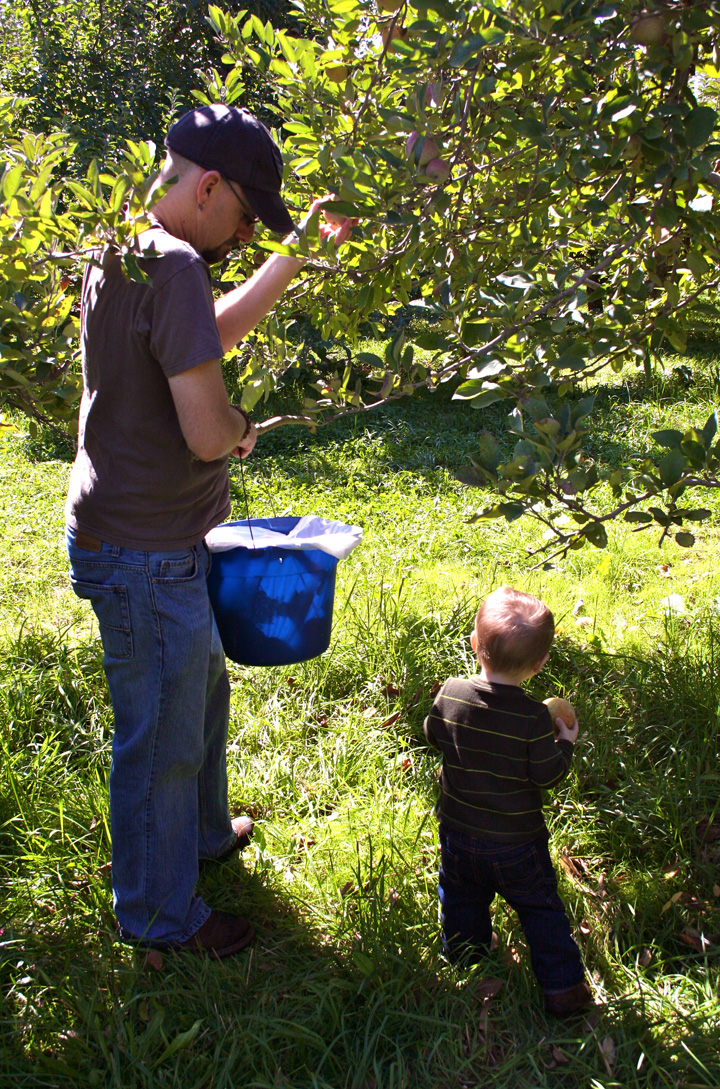
This page is dedicated to the late Steve Jobs, whose innovations shaped my generation. RIP.

Another page done for the quiet book! Phones and clocks are classic pages that are almost always included, but I just wasn’t feeling the rotary phone and boring clock.

When I started brainstorming how to update them, I knew I wanted to do my white iPhone. Jax has a play phone app and loves to hold it up to his ear and say “Yeah-Oh?” (hello). I wanted to combine the clock with the phone since both deal with numbers and using household gadgets. My first idea was to have a slap bracelet covered in felt with a felt clock face to make a wristwatch, but I thought the scale wouldn’t work. Since phones go in pockets, I settled on a pocket watch and a big jean pocket to put them in!


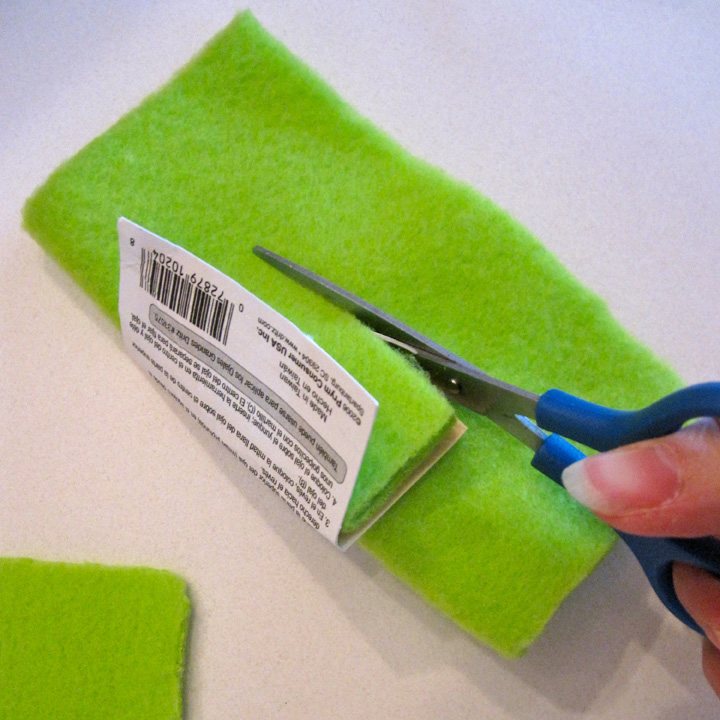
My materials were: a 9″ blue felt square (you could use denim or even cut up jeans, but both items might not fit in the pocket), felt (in white, red, orange, yellow, green, aqua, blue, white, dark gray and light gray), clear vinyl, batting/stuffing, thin white ribbon, 7/8″ – 1″ wide ribbon 1 inch longer than your page width, a paper fastener and floss/thread to match. Everything was hand-sewn except the vinyl, but you could use the machine for parts.

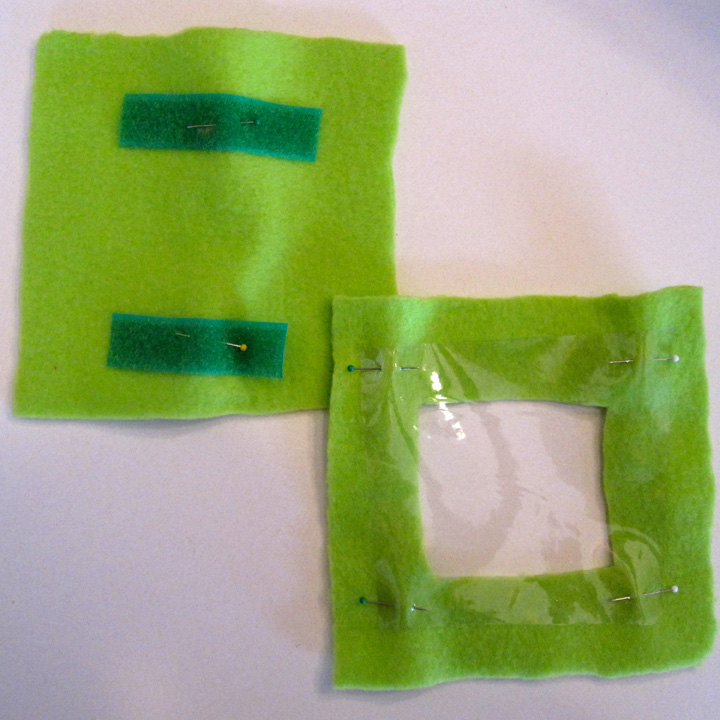
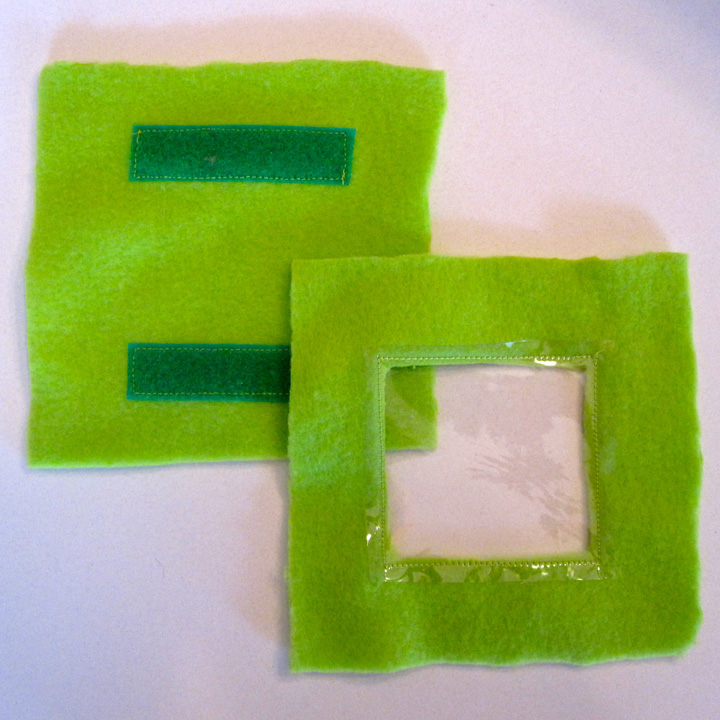
Sewing the iPhone: I appliqued the symbols to each button and outlined them in white stitching. I hand-stitched the phone numbers to the dark gray screen in stem stitch and the “HELLO!” to the aqua header in running stitch. I sewed the buttons, header and light gray top bar to the screen then sewed that to the phone front. I sewed the home button to the front as well, then did some embroidery and a French knot to make the speaker and front camera. On the sewing machine, I sewed clear vinyl over the phone screen. On the back of the phone, I sewed the camera circle and Apple logo. Layering batting and the end of a white ribbon, I sewed front and back together.

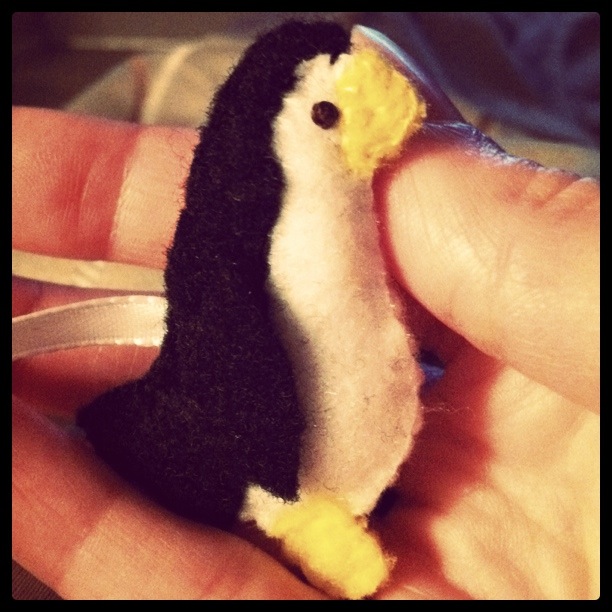
Sewing the pocket watch: I hand-stitched the clock numbers to the face with stem stitch. I made the clock hands by sewing two layers of felt together for each, then pushed a paper fastener through the ends of both. I pushed the fastener through the clock face and bent the backs so that there was plenty of height for the hands to turn around. I sewed the face to the front of the clock. I sewed the end of a white ribbon between the two pieces of clock dial, then layered that and some batting between the two clock sides and sewed them together. I actually added a small rattler to my clock. I got a stained baby toy for 50 cents at the thrift store and cut it open. I don’t need my quiet book to be silent.

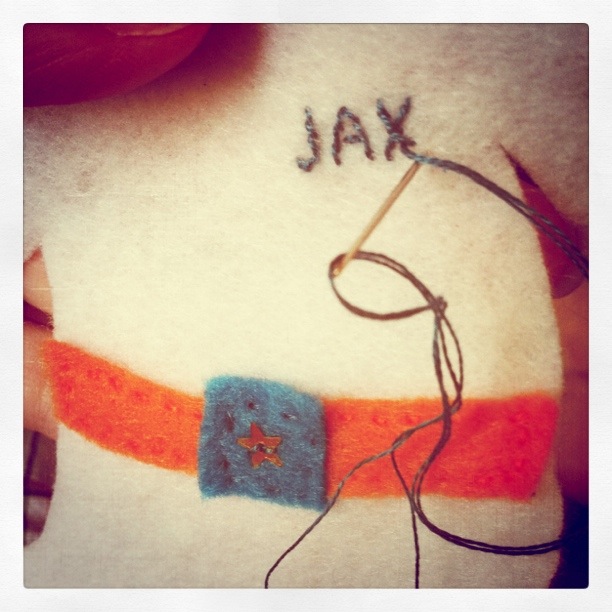
I decorated my pocket with two rows of stitching along the top and used my paper pattern to do two rows for the decorative arch. I sewed the other ends of the two ribbons down under where the pocket would go, then sewed three sides down with double rows of stitching. I sewed the three belt loops on and ran a ribbon through it, tacking it down on each side on the back.

What do you think? For more free quiet book patterns, go here! If you use this pattern, please add a comment or link to me. I really would love to see your version!

Thrift Store Gems

After a couple weeks of the kids thrift store being closed, we finally were able to get back into our Monday routine and pay a visit after Starbucks!

Jax loves going because he is allowed to be down on his own two feet exploring instead of strapped into the baby carrier or held back. The shopkeeper doesn’t mind him playing wit the toys and nothing is breakable. (Everything is cheap even if he did break or tear something.) I use the thrift store as a place to practice shopping with Jax. He is getting very good at putting things back if I ask. I’ve even started letting him help at the grocery store after all the practice!

There weren’t many clothes in his size today, but we found toys and books. Because I got some toys, I put together a big box of too-young toys for Jax to give away as soon as we got home. When something “new” comes in, something old goes out!

Here’s what we got for $14:

Books: The Laughing Dragon (This book is gorgeous and out of print. A great find!), Baby Faces (Also out of print, this gets great reviews. It shows different emotions.), Way Out in the Desert (I’m putting this one in our bedtime book basket.), Baby Says Peekaboo! (Jax loves books with peekaboo flaps!) and Ten Apples Up on Top! (I handed this to Jax to look at on the drive home and he said “App-Pull! App-Pull!”).


Toys: Little Tikes Wee Waffle Blocks ‘N Bucket (I hadn’t seen this before. I normally avoid sets of plastic blocks, but I like that these are advanced for Jax and will help with his motor skills. For $3.75 they are worth a try! We have a Circo (Target) train like this  Melissa & Doug Stacking Train set with 2 cars that Jax loves. It is his bedroom toy for while I am showering. He has mastered his little train, so I put the one other bedroom toy (a shape sorter he has outgrown) in the donate box and added this train set to his basket.

Clothes: Just a button down I will layer over a thermal. Anything green to match his shoes is good!

Sunday Souvenir – A Month for my Mother

October is breast cancer awareness month, so I am dedicating this month’s Sunday Souvenirs to my mother. She lost her battle with breast cancer when I was just five.

I wish I had wonderful memories of her to share and treasure, but I don’t. I don’t remember much about her at all. I have one memory of visiting her hospital room with a finger painting I made. I remember when my dad told us she had died. I was just too young.

Tonight I went through the beginning of my mother’s baby book. Her name was Donna Lynn – we share a middle name. I focused on her first birthday and some baby items since my baby boy is 1.5 now.

There is a beautiful baby necklace and bracelet set made of pinkish pearls. A silver and ivory teething ring. Silver bib fastener. I will be putting it all in a shadow box to hang on the wall when I find the right one.

I adore the photos of my mom from her first birthday. Her sweet face was in my mind as Jax ran to me to go get ready for bed once I’d finished taking pictures. For the first time, I realized how badly I wished my mom could have met Jax and seen the woman I’ve become. I’m crying a little as my sweet son snores on my shoulder.

I have so much to read in baby book about her first two years, but I have to wait until Jax isn’t near enough to rip the pages. when he is older, we can look through photos of his grandma together.

Leave a comment if write a Sunday Souvenir and you’d like your link to be added!

iSpy Quiet Book Page

So I originally made a stand-alone iSpy game and Velcroed it to a Quiet Book page, but the next day I decided the 2″ thick bag was just too much for the book. I also wanted a larger window so Jax could find the items easier. So, I cut the bag open and started over!

Here is what I did to make a large, flat iSpy game that will be zigzag-stitched to my white flannel quiet book page. (You can see an example of a finished page here.) My materials were: two squares of felt that are slightly smaller than my book pages (mine are 9″ in tie dye and lime green), a square of clear vinyl that is slightly smaller than your felt, poly pellets, buttons and trinkets, ribbon, stick-on felt letters and a key card. For more details on the key card and supplies, see my iSpy bag tutorial.

I took my top felt piece cut out a square in the middle for the window. You can cut out any shape and any size. I went for a large window to make it easier for Jax. I don’t want him to have to squish the page a lot like you would an iSpy bag. A couple shakes moves everything around. I sewed the square of clear vinyl to the back of the window, going around twice for security. Then I trimmed the extra vinyl and rounded the corners so they didn’t poke through.

I layered the front and back felt pieces together and sewed them together on 3 sides, again going around twice. You don’t want to leak pellets! I didn’t sew all the way at the edge of my felt because I didn’t want a lot of the bag contents to be hidden. The more you have hidden, the harder the game will be. I filled the bag with pellets and trinkets then sewed the top shut with my key card ribbon in the seams.

To finish it up, I added “I SPY” to the top of the page. Easy!

iSpy Bag Tutorial

Update:The iSpy bag came out so freaking cute, but I ultimately decided it was too thick for the quiet book. I’ll be posting my redo of it tomorrow or Monday. But, I still plan to use the method blow to make iSpy games as fun, easy gifts!

I love iSpy games! They have all kinds of fun trinkets buried in beads/pellets/rice and you have to squish them around to find everything. It’s a little beyond Jax right now, but I wanted to make one and have it be able to attach to a page in his quiet book.

On the quiet book page

The page itself is simple. I took a piece of fancy felt (tie dye) and sewed down two strips of Velcro so the game would have a place to live when it wasn’t in use. This page will be thick, but most of mine are.

Here’s how you make an iSpy bag. They are fun to make even if you aren’t making a quiet book!

You’ll need:

  • fleece scraps (mine were two 6″ squares)
  • a scrap of clear vinyl (mine was about 5″)
  • poly pellets, beads or rice
  • ribbon (to attach your key card)
  • fun objects (buttons, trinkets, paperclips…)
  • print out of your objects (laminated or covered in clear packing tape)
  • sewing machine/thread/scissors
  • Velcro (if you are attaching it to a Quiet Book page

I started with two pieces of fleece that were about 6″ square. I sewed the other half of the Velcro strips to the back piece. I took the front piece and folded it in half. I took a square of scrap cardboard and folded that in half as well. I centered it over the fold of the fleece and cut it out to make the window hole.

I took a square of clear vinyl that was larger than my window and sewed it to the wrong side of the fleece, then trimmed it down to about 1/4″. I pinned the front and back pieces together, right sides facing, and added one end of a ribbon. (I sewed the ribbon into a side seam then pulled it up through the side I left open. I wanted it to be anchored into two seams.) I sewed around 3 sides then turned it right side out. I was going for rounded corners, so I didn’t clip mine before turning.

I took all my fun objects I’d collected and placed them in the bag. I mostly had decorative buttons I’d found for a great price at the craft store. They gave me a really good assortment of objects to search for. Then I filled the bag about 2/3 full of poly pellets. I folded in the open side and pinned it shut. I top stitched around the whole bag, going 2 times over the open side (and testing the seam by trying to pull it open afterwards. You don’t want pellets going everywhere!)

For my key card, I laid out my objects beforehand and took a photo of them on a white background. In Photoshop, I rearranged them a bit and added text. (You can download the font I used for free here. It is made from my handwriting.) I printed the 4″ square on 4″ x 6″ photo paper and trimmed it down. I don’t have and laminating pouches, so I took clear packing tape and covered both sides to make it waterproof and more stable. I expect I’ll need to replace it eventually if it gets too folded. I punched a hole in the top and tied it to the other end of the ribbon.

So fun! I’ve played with it a bit with Jax and he was excited when we found the “choo choo”! I think adults can have just as much fun as kids. I may do something with iSpy bags as gifts or party favors in the future. They take so little time to make!